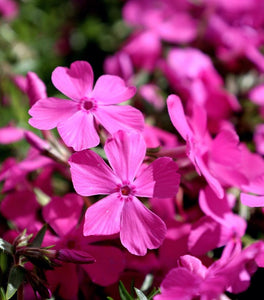
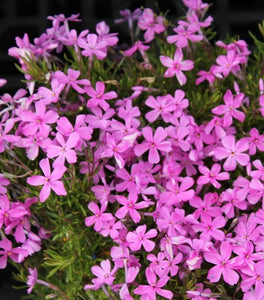
Images Depict Mature Plants
Emerald Blue Creeping Phlox
Phlox subulata 'Emerald Blue'
If you want a spring groundcover that looks like you hired a designer, Emerald Blue creeping phlox is one of my go-to picks—low, tidy, and then a full-on blanket of deep blue blooms that makes borders, rock gardens, and sunny slopes feel instantly finished. Give it full sun and sharp drainage, water it well while it’s getting established, and then just hit it with a quick post-bloom trim to keep that mat dense and clean for next year’s show.
📦 Free shipping on orders over $99.
Delay shipping by leaving us a message at Checkout.
Share:Recommended Add-Ons


Emerald Blue Creeping Phlox Groundcover For A Blue Spring Carpet
Deep Blue Spring Blooms That Create A Dazzling Groundcover
Emerald Blue creeping phlox is one of the easiest ways to paint your landscape in true blue. In spring, it produces masses of deep blue flowers that blanket the foliage and turn bare edges into a vibrant carpet. Planted in drifts, the color reads from the curb; planted along a path, it becomes a ribbon of bloom that makes the whole garden feel intentional and “finished” the moment spring arrives.
Because the flowers sit right on top of the mat, the display feels dense—more like a living quilt than scattered blossoms. It’s a natural partner for spring bulbs and early perennials, and it looks especially charming cascading over stones, walls, and steps. When you want that “soft pillow of color” effect in a spot that’s tough to mow or hard to edge, Emerald Blue is a dependable, designer-friendly solution.
Evergreen, Low-Growing Coverage That Stays Neat And Polished
This creeping phlox forms a tight, mat-making habit with fine, needle-like foliage that stays low and tidy. Mature plants typically reach just a few inches tall, so they frame beds without blocking other plants, and they tuck neatly into rock gardens where you want coverage without clutter. Once the mat knits together, it also functions like living mulch—helping shade soil and reduce weed pressure in sunny, exposed areas.
Emerald Blue is especially useful for crisp edges: along flagstone, at the front of borders, or spilling from the top of a wall. The foliage provides structure beyond bloom season, and the plant’s natural habit stays compact with minimal intervention. Give it sun and sharp drainage, and you’ll get a groundcover that looks curated—not wild—season after season.
Built For Sunny Slopes, Banks, And Rocky Problem Areas
If you have a sunny bank, a rocky embankment, or a dry strip where other plants struggle, Emerald Blue creeping phlox is in its element. It prefers drier, average-to-sandy soil conditions and thrives where water drains quickly. That makes it a smart pick for slopes and edges where irrigation can be inconsistent and where you want beauty without constant babysitting.
On slopes, the spreading habit helps knit the surface while creating that classic “spill” effect over stones. The key is establishment: plant in well-draining soil, water deeply at planting, and keep moisture consistent for the first few weeks so roots can anchor. After that, Emerald Blue is notably resilient and heat-tolerant for a spring-blooming groundcover, making it a practical choice for high-sun sites.
Easy Care Color With A Simple Post-Bloom Refresh
Emerald Blue is low maintenance in the way gardeners actually want: no complicated pruning calendars and no heavy feeding required to look good. After flowering, a quick light shear (think “tidy haircut”) removes spent blooms, encourages branching, and keeps the mat dense rather than opening up or getting woody in the center. It’s a fast, satisfying task that pays you back the following spring.
You can also keep borders crisp by trimming edges anytime the mat creeps beyond its lane. For the cleanest long-term performance, prioritize airflow and drainage—especially in heavier soils—and avoid overwatering once plants are established. With sun, sharp drainage, and that quick post-bloom trim, Emerald Blue becomes a set-it-and-smile groundcover that delivers a reliable spring show.

| Hardiness Zone: | 3-9 |
|---|---|
| Mature Height: | 4 to 6 Inches |
| Mature Width: | 18 to 24 Inches |
| Sunlight: | Full sun |
| Bloom Time / Color | Early to late spring; deep blue |
| Soil Condition: | Prefers dry, average, or sandy soil; well-drained |
| Water Requirements: | Water well until established |
| Wildlife Value | Pollinators visit blooms |
| Resistance | Deer resistant; drought tolerant once established |
| Landscape Uses | Mass planting, ground cover, rock gardens, slopes/banks, edging, wall spillover |
How to Care for Emerald Blue Creeping Phlox
Before you buy a Creeping Phlox Emerald Blue Plant, make sure to read about the recommended care instructions to keep this plant healthy and thriving.
How should I plant Emerald Blue Creeping Phlox?
Choose a full-sun location with well-drained soil—this plant performs best where water moves through the root zone instead of sitting around the crown. Dig a hole about twice as wide as the root ball and set the plant so the top of the root ball is level with the surrounding soil. Backfill, firm gently, and water deeply to settle roots. Keep mulch light and pulled back from the crown (don’t smother stems), especially in heavier soils. On slopes, plant into small leveled pockets so water can soak in rather than running off.
How often should I water Emerald Blue Creeping Phlox after planting?
For the first 2–3 weeks, water every 2–3 days (more often during heat or wind) so the root zone stays evenly moist but not soggy. After that, transition to deep watering about once per week, adjusting for rainfall and soil type—sandy soils dry faster and may need more frequent watering. Once established, Emerald Blue is more drought tolerant, but it looks best when it isn’t stressed during spring growth and bloom. If you want the densest mat and cleanest flower show, avoid letting it go bone-dry for long stretches in its first growing season.
When should I fertilize Emerald Blue Creeping Phlox?
Feed lightly in early spring as new growth begins, using a balanced, slow-release fertilizer or a thin top-dressing of compost. Creeping phlox doesn’t need heavy feeding, and too much nitrogen can push leafy growth at the expense of flowers. If your soil is very lean or you’re growing it in containers, a modest follow-up feeding after bloom can support fresh regrowth. Keep fertility moderate—sun and drainage do more for this plant than extra fertilizer ever will.

When and how should I prune Emerald Blue Creeping Phlox?
Trim Emerald Blue creeping phlox right after flowering. A quick shear to remove spent blooms and lightly shape the mat encourages branching and keeps the plant dense, fresh-looking, and less likely to get woody in the center. You can also tidy edges anytime during the growing season if it creeps beyond a border line. If older patches look thin, selectively trim back a portion after bloom to stimulate new shoots—this simple “reset” keeps coverage lush over time.