

How to Plant Trees and Shrubs in the Fall and Winter: Step-by-Step Guide
 By Richard "Woodie" Buller, GGD co-founder with 35+ years in horticulture
Published On: Nov 17, 2017
Share:
| In this Article | |||
|---|---|---|---|
After a long summer, it is tempting to think the planting season is ending. Leaves begin to change color, flowers start to fade, and many gardeners prepare to put their shovels away until spring.
I have always looked at fall differently.
Fall is one of the best times to plant trees and shrubs. The cooler air places less stress on newly installed plants, while soil that has been warmed all summer can remain suitable for root growth well after the first leaves begin to drop. Instead of using energy to produce flowers, leaves, and soft new stems, many plants can concentrate on establishing the roots that will support next year's growth.
That makes fall an excellent time to plant shade trees, flowering trees, native trees, evergreen privacy plants, foundation shrubs, hedges, and many other hardy landscape plants.

A fall-planted tree or shrub still requires proper care. Cooler weather does not eliminate the need for water, and dormant plants are not dead plants. But when you choose the right plant, install it at the correct depth, and keep the root zone appropriately moist, fall planting can give your landscape a valuable head start.
Why Fall Is a Great Time to Plant Trees and Shrubs
The biggest advantage of fall planting is the relationship between air temperature and soil temperature.
As autumn arrives, cooler air reduces the amount of moisture plants lose through their foliage. At the same time, the ground retains warmth from summer. Roots may continue developing while above-ground growth slows or stops.
That gives a newly planted tree or shrub an opportunity to begin settling into its new location without immediately facing summer heat.
Fall planting offers several advantages:
- Cooler temperatures reduce transplant stress.
- Warm soil supports root development.
- Lower evaporation helps soil retain moisture longer.
- Weed growth and competition begin to slow.
- Dormant deciduous plants lose less moisture through their leaves.
- New roots can give plants a head start the following spring.
- Cooler weather makes digging and planting more comfortable.
The benefit becomes especially clear the following summer. A tree planted in spring may have only a short establishment period before hot weather arrives. A tree planted in fall has already spent months in its permanent location before facing that first summer.
Fall does not magically establish a tree overnight, but it gives the plant more time. And time is one of the most valuable things you can give a new tree.
Fall is not the only workable window, of course. If you missed it, our guide to planting trees and shrubs in the summertime covers what changes when the heat is on.
When Is It Too Late to Plant Trees and Shrubs in Fall?
There is no single planting deadline that applies to every plant or every part of the country.
Your average first frost date can help you plan, but the first light frost does not automatically end the planting season. A frost may damage tender annuals while the soil remains perfectly workable for planting hardy trees and shrubs.
In many regions, container-grown and balled-and-burlapped trees and shrubs can be planted as long as the ground is not frozen or waterlogged and the soil can be properly worked around the root ball.
Earlier is still better. The more time roots have to establish before the ground consistently becomes cold, the better prepared the plant will be.
Plant Evergreens Earlier in Fall
Broadleaf and needled evergreens deserve special attention.
Arborvitae, hollies, junipers, cypress, spruce, pine, cherry laurels, boxwoods, and other evergreen plants continue losing moisture through their foliage during winter. Their roots need access to moisture even though visible growth has slowed.
For that reason, I prefer planting evergreens earlier in fall, particularly in colder or windy regions. This gives their roots more time to establish before winter winds and frozen soil limit their access to water.
If you are planting a privacy screen this fall, our guide to planting arborvitae trees covers spacing and siting in more detail.
Use Caution With Marginally Hardy Plants
Plants near the coldest edge of their USDA Hardiness Zone may be safer planted in spring. Check your zone on the USDA Plant Hardiness Zone Map before you buy.
Crape myrtles, gardenias, certain broadleaf evergreens, and other cold-sensitive plants may benefit from having a full growing season to establish before their first winter. Local climate, exposure, soil drainage, and the individual plant all matter.
Fall is an excellent planting season, but good gardeners still match the planting time to the plant.
Can You Plant Trees and Shrubs in Winter?
In climates where the ground does not freeze solid, dormant-season planting can continue into winter.
Professional growers and landscapers frequently plant woody plants during dormancy because there is less demand for foliage and soft new growth. The same principle can work in a home landscape as long as the soil remains workable and conditions are suitable.
Do not plant into frozen soil, saturated ground, or a hole filled with water. You need loose soil that can be returned around the root ball without leaving large frozen clumps or air pockets.
If a winter planting window opens during mild weather, water the plant thoroughly after installation and apply mulch over the root zone.
The plant may look as though nothing is happening. Below the surface, however, it is positioned to begin establishing whenever soil temperatures permit.
Deciduous Trees Are Excellent Candidates for Fall Planting
Deciduous trees lose their leaves as they enter dormancy. Without a full canopy drawing moisture from the roots, water demand and transplant stress both drop.
This makes fall a particularly good time to plant many shade, flowering, native, and ornamental trees. Browse the full deciduous tree collection to see what is available this season.
Potential fall-planted deciduous trees include:
- Red Maple
- October Glory Maple
- Brandywine Red Maple
- Autumn Blaze Maple
- Ginkgo
- American Sycamore
- Bald Cypress
- Eastern Redbud
- Flowering Dogwood
- Serviceberry
- Deciduous Magnolia
- Crabapple
- Birch
- Elm
- Tulip Poplar
Always confirm that the individual tree is hardy in your region and suited to the planting site.
Planting Shade Trees in Fall
A well-placed shade tree is one of the best long-term improvements you can make to a property.
Shade trees cool patios, driveways, outdoor seating areas, and portions of the home. They add height and scale to the landscape, provide wildlife habitat, intercept rainfall, and increase the sense that a house belongs within its surroundings. We covered the full case in our article on the benefits of shade trees for humans and the environment.
Fall is also a good time to decide where a shade tree is genuinely needed. After living through another summer, you know where the afternoon sun was strongest. You know which windows received the most heat and which outdoor spaces became uncomfortable.
Place a deciduous shade tree where its mature canopy can provide useful summer shade without interfering with the house, roof, utility lines, driveway, or other structures.
Remember that you are not placing the tree where it fits today. You are placing it where its mature canopy and roots will fit in decades to come. If you are still narrowing the list, our guides to choosing trees for your front yard and selecting backyard trees both work through the siting questions.
Woodie's Picks: Six Trees to Plant This Fall
These are the six I keep coming back to for fall planting. Every one of them is hardy across a wide range of the country, transplants well as a container-grown plant, and earns its space in the landscape for decades.
Autumn Blaze Maple
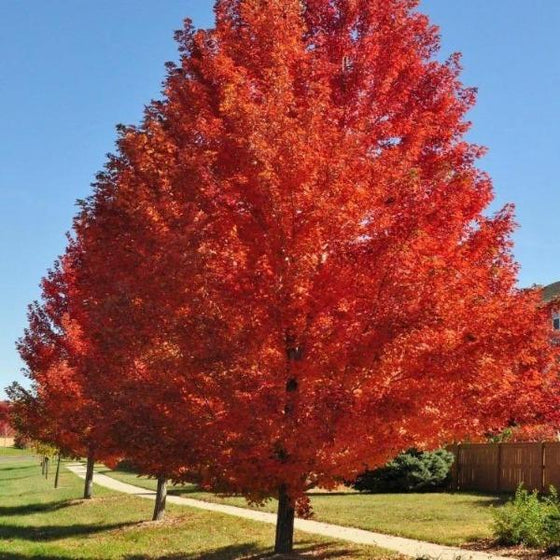
Autumn Blaze is a hybrid of red maple and silver maple, and it inherited the best of both: the fast growth rate of one parent and the fall color of the other. It is the tree I recommend most often when someone wants meaningful shade sooner rather than later. Give it room — it reaches 40 to 50 feet tall and 30 to 40 feet wide.
October Glory Red Maple

October Glory is a selection of our native red maple, Acer rubrum, and it holds its color later into the season than most maples — which is exactly where the name comes from. It handles a wider range of soils than people expect, including sites that stay damp. A reliable, long-lived street and lawn tree.
Brandywine Red Maple
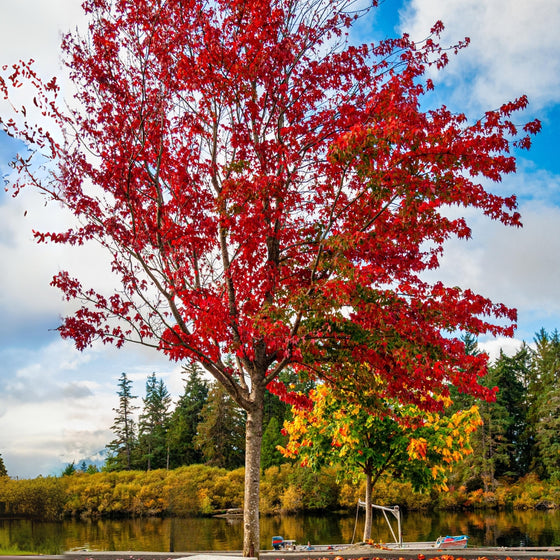
Brandywine is a seedless red maple, which matters more than it sounds — no samaras spinning down into gutters and garden beds every spring. The fall color runs red and then deepens toward purple. It is a slightly smaller tree than Autumn Blaze, which makes it a better fit for a tighter front yard. See how the maples compare in our full maple lineup.
Autumn Gold Ginkgo
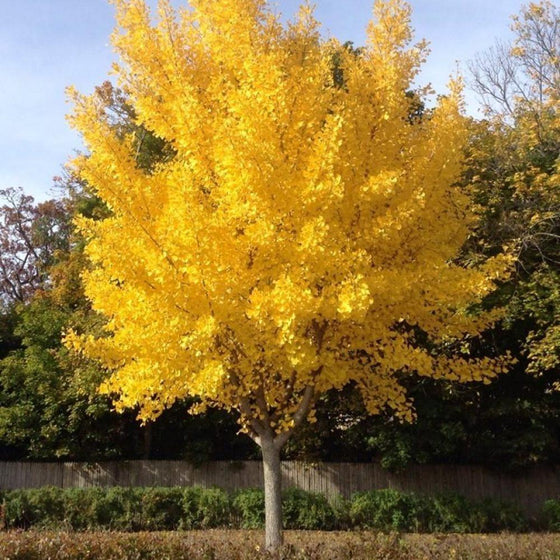
Ginkgo biloba is about as tough an urban tree as exists — it tolerates pollution, compacted soil, road salt, and heat. Autumn Gold is a male selection, so it does not produce the notoriously foul-smelling fruit. The fall color is a clear, uniform yellow, and the leaves tend to drop over just a few days. Slow to start, but a tree your grandchildren will know.
Eastern Redbud

Cercis canadensis is a native understory tree, which means it is genuinely happy in part shade — a rare thing in a flowering tree. The rosy-pink flowers appear directly on bare branches before the leaves, making it one of the earliest signs of spring in the landscape. At 20 to 30 feet, it fits where a shade tree will not. Read more on what makes redbuds worth planting.
Autumn Brilliance Serviceberry

Serviceberry earns its place four times a year: white flowers in early spring, edible June berries that birds find before you do, orange-red fall color, and smooth gray bark that carries the winter. Amelanchier is native across most of North America and works as either a multi-stem specimen or a small single-trunk tree. If you want one plant to do the most work in a small yard, this is it.
Fall Is Also a Great Time to Plant Shrubs
Trees receive much of the attention during fall planting season, but shrubs benefit from the same cooler temperatures and warm soil.
Fall is a good time to plant:
- Foundation shrubs
- Flowering shrubs
- Evergreen shrubs
- Native shrubs
- Privacy shrubs and hedge plants
- Pollinator shrubs
- Shrubs with fall color
- Shrubs with winter berries or colorful stems
Hydrangeas, viburnums, ninebark, spirea, hollies, junipers, boxwoods, arborvitae, azaleas, rhododendrons, weigela, dogwoods, beautyberry, and many other hardy shrubs can be planted in the fall when suited to the local climate.
Do not overlook spring-flowering shrubs simply because they are not blooming in fall. Planting them now allows them to wake up in their permanent location next spring. Our guide to hydrangea care is a good place to start if that is the direction you are leaning.
Choose the Right Tree or Shrub Before You Dig
Successful planting begins with plant selection.
Before choosing a tree or shrub, determine the site's sunlight, drainage, soil conditions, available space, and exposure to wind. Then consider the plant's mature height and width — not the size of the container sitting in front of you.
Ask the following questions:
- Is the plant hardy in my USDA Hardiness Zone?
- Does the site receive enough sunlight?
- Does the soil drain properly?
- Will the plant fit at maturity?
- Are there overhead or underground utilities nearby?
- Is the plant appropriate for the distance from the house?
- Will its roots or branches interfere with the pavement?
- Does the location provide the landscape function I need?
If you are planting a row for privacy, calculate spacing according to mature width and how quickly you want the plants to meet. Planting more closely can create faster screening, but planting too tightly may lead to crowding, poor airflow, uneven growth, and increased competition for water. Our guide to choosing the best privacy trees works through the spacing math.
Call Before You Dig
Before digging a large planting hole, have underground utilities marked through your local utility-location service. In the United States, that means calling 811 or filing a request through 811beforeyoudig.com. The service is free.
Do not assume you know where every cable, water line, gas line, or irrigation pipe runs. This is particularly important when planting large trees, privacy rows, or shrubs near property boundaries and utility easements.
A little planning before the shovel goes into the ground can prevent a dangerous and expensive mistake.
How to Plant a Tree or Shrub in Fall, Step by Step
The process below applies to container-grown and balled-and-burlapped plants alike. Where the two differ, I have said so.
Before You Start: Prepare the Plant
If possible, water the container or root ball before planting. A dry root ball can resist absorbing water even after it is placed in moist soil.
Handle the plant by its container or root ball rather than lifting it by the trunk or stems. Protect the foliage and branches during transportation, and do not allow the root system to dry out while the planting hole is being prepared.
Plant as soon as practical after receiving or purchasing the tree or shrub. If planting must be delayed, keep the root ball appropriately moist and protect it from drying wind and direct afternoon sun.
Find the Root Flare Before You Measure the Hole

The root flare is where the trunk widens and transitions into the tree's major structural roots. It should be visible at or slightly above the surrounding soil when planting is complete.
Do not assume the top of the container soil is the correct planting depth. Trees are sometimes planted too deeply during nursery production, and additional soil or growing media may cover the root flare.
Gently remove excess soil from the top of the root ball until you locate the first major structural roots. Measure the depth of the planting hole from the root flare — not automatically from the top of the container.
This one step can prevent one of the most common and damaging mistakes in tree planting. The University of Maryland Extension covers the depth question in more detail if you want a second opinion before you dig.
Step 1: Dig a Wide, Shallow Planting Hole
Dig the planting hole at least twice as wide as the root ball, but no deeper than the distance between the bottom of the root ball and the exposed root flare.
A wide hole loosens the surrounding soil and makes it easier for new roots to grow outward.
The bottom of the hole should remain firm and undisturbed. If you dig too deeply and refill the bottom with loose soil, the weight of the root ball may eventually compress that soil and cause the plant to settle. A tree that looked properly positioned on planting day may end up too deep months later.
In heavy or compacted soil, slope the sides of the planting hole outward rather than creating a smooth-sided cylinder. Roughen glazed soil surfaces with the edge of your shovel so new roots can move into the surrounding ground.
Step 2: Remove the Plant From Its Container
Lay a container-grown tree or shrub gently on its side and slide off the pot. Do not pull the plant out by its trunk or branches.
Examine the root ball. Healthy roots should generally appear firm and light-colored beneath the surface. If roots are circling the outside of the root ball, loosen them with your fingers or a hand cultivator.
Severely root-bound plants may need several shallow vertical cuts along the sides and across the bottom of the root ball. A clean, sharp bypass pruner makes this easier than a knife. Remove roots that are broken, dead, kinked, or circling tightly around the trunk.
The goal is to encourage roots to grow outward into the surrounding soil rather than continue circling within the shape of the old container.
Step 3: Prepare Balled-and-Burlapped Plants Properly
Place a balled-and-burlapped tree or shrub in the hole before removing supporting materials that help hold the root ball together.
Once the plant is correctly positioned, remove all twine from around the trunk and root ball. Pull back or remove as much burlap as possible without causing the root ball to fall apart.
Synthetic burlap must be removed because it will not decompose like natural burlap.
Remove the wire basket whenever possible without destroying the root ball. If complete removal is impractical, remove at least the upper portion so the wire does not remain near the trunk and major surface roots.
Never leave twine wrapped around the trunk. As the plant grows, that forgotten material can girdle and eventually kill it.
Step 4: Set the Correct Planting Depth
Place the tree or shrub in the center of the hole and check its height with a shovel handle, board, or yardstick laid across the surrounding grade.
The root flare should be visible at or slightly above the finished soil level. In heavy clay or poorly drained soil, planting slightly high may be preferable to planting too deeply.
Stand back and view the plant from multiple directions. Make sure the trunk is straight and orient the most attractive or structurally balanced side toward the primary viewing area.
If the plant is too low, remove it and add firm soil beneath the root ball. Do not attempt to correct the problem by pulling upward on the trunk after backfilling.
Nothing will shorten the life of a tree much faster than burying its root flare.
Step 5: Backfill Primarily With the Existing Soil
Use the soil removed from the planting hole as the primary backfill.
Older planting advice often recommended filling the hole with a rich mixture of compost, peat moss, topsoil, and native soil. That can create an isolated pocket that holds too much water or discourages roots from leaving the planting hole.
If the entire planting area has poor, compacted soil, improve a broad area rather than creating one heavily amended hole. A soil test can help determine whether organic matter or other corrections are genuinely needed — and whether the pH is working for or against the plant you have chosen.
Return the native soil around the root ball in stages. Firm it gently with your hands to remove large air pockets, but do not pack it so tightly that roots lose access to oxygen and water.
Add water during backfilling to help settle soil naturally around the roots.
Step 6: Water Thoroughly After Planting
Water immediately after planting.
A thorough initial watering moistens the root ball, settles soil around the roots, and helps eliminate hidden air pockets. Apply water slowly enough that it soaks into the planting area rather than running across the surface. A slow-release tree watering bag does this better than a hose you have to stand and hold.
Do not assume fall rainfall will provide everything the plant needs.
A rainy week can be followed by a dry month, and the original potting mix may dry at a different rate than the surrounding soil. Check moisture in both the root ball and adjacent soil.
The soil should feel moist but not saturated several inches below the surface. If it feels dry or only slightly damp at that depth, it is time to water.
Step 7: Apply Mulch Correctly

Spread approximately 2 to 3 inches of organic mulch across the root zone.
Mulch helps conserve soil moisture, moderate temperature changes, reduce weed competition, and protect the trunk from lawn mowers and string trimmers.
Keep mulch several inches away from the trunk or main stems. The root flare should remain visible.
Never pile mulch against the trunk in the shape of a volcano. Thick mulch pressed against bark can retain moisture, encourage decay, conceal rodents, interfere with oxygen exchange, and promote roots where they should not grow.
Think doughnut, not volcano.
Step 8: Stake Only When Necessary
A correctly planted tree often does not need staking.
Some wind movement encourages the trunk and roots to develop strength. Automatic staking can create a tree that becomes dependent on support.
Staking may be appropriate when:
- The planting site is unusually windy.
- The root ball is small in proportion to the canopy.
- The soil is loose or unable to hold the root ball securely.
- The tree begins leaning after planting.
- The tree has a top-heavy canopy.
Use broad, flexible tree ties rather than wire or narrow cord, and place them against the bark. A purpose-built tree staking kit includes the right straps for the job. Position ties low enough to allow some trunk movement while preventing the root ball from shifting.
Remove the supports after the tree is stable, generally after one growing season. Forgotten ties can cut into the trunk and cause serious damage.
Shrubs rarely require staking.
Step 9: Prune Conservatively
At planting time, remove only dead, broken, diseased, or seriously damaged branches.
Do not heavily prune a newly planted tree to balance the canopy with the roots. Leaves and healthy branches help the plant manufacture the energy needed for establishment.
Major structural pruning can usually wait until the tree has begun to establish, unless a branch poses an immediate hazard or a serious structural defect. When that time comes, our guide to trimming landscaping trees covers the cuts worth making.
Be especially careful with spring-flowering shrubs. Their flower buds may already be present in the fall, and unnecessary pruning can remove next spring's display.
Step 10: Skip Unnecessary Fertilizer
Newly planted trees and shrubs usually do not need a heavy application of fertilizer.
High-nitrogen fertilizer can encourage soft top growth when the plant's priority should be root establishment. It may also be unnecessary if the surrounding soil already contains adequate nutrients.
If you use anything at planting, choose a low-nitrogen starter formulated for transplanting — Espoma Bio-tone Starter Plus is the one we stock — rather than a general-purpose lawn or high-nitrogen feed. Save the regular feeding program for the following spring, once the plant is established.
Use a soil test to identify actual deficiencies rather than feeding by habit.
Planting depth, healthy roots, appropriate moisture, drainage, and mulch will contribute more to establishment than trying to force rapid growth with fertilizer.
How Often Should You Water Fall-Planted Trees and Shrubs?
There is no responsible watering schedule based only on the calendar.
Soil type, temperature, wind, rainfall, root-ball size, plant type, and drainage all influence how quickly the root zone dries. Sandy soil may require more frequent watering than clay, while poorly drained clay can remain wet long enough to damage roots.
Check the soil rather than assuming.
Water slowly and deeply whenever the root ball and surrounding soil begin to dry out several inches below the surface. Make sure the water penetrates through the mulch and reaches the roots.
Frequent shallow sprinkling encourages shallow roots and may leave the center of the root ball dry. A slow trickle from a hose, a soaker hose, drip irrigation, or a tree-watering bag can apply moisture more effectively.
Continue checking newly planted trees and shrubs until the ground freezes in colder climates. If autumn has been dry, give the planting a thorough watering before the soil freezes.
Winter Watering for Evergreens

Evergreens can lose moisture from their foliage throughout winter, particularly during sunny, cold, or windy conditions.
If winter weather is dry and the ground is not frozen, check the soil around newly planted arborvitae, hollies, junipers, spruce, pine, cypress, boxwood, and other evergreens.
Water when the root zone is dry, and temperatures are warm enough for the water to enter the soil.
Do not water onto frozen ground, where it cannot reach the roots and may create hazardous ice.
A properly watered evergreen entering winter is much better equipped to handle drying winds.
Should You Use an Anti-Desiccant?
Anti-desiccant sprays are sometimes used on broadleaf evergreens and other plants vulnerable to winter moisture loss. They form a temporary coating intended to reduce water loss through foliage. Wilt-Pruf is the product we carry.
These products can be helpful in certain exposed, windy locations, but they are not substitutes for proper planting, fall watering, mulch, or selecting a plant suited to the site.
Read the product label carefully. Some plants should not be treated, and weather conditions during application can affect performance.
Protect Young Trees From Winter Damage
Newly planted trees can face winter damage from deer, rabbits, voles, temperature fluctuations, and lawn equipment.
Use trunk guards or protective fencing where browsing or gnawing animals are common. Keep mulch away from the trunk so rodents are not given a protected place to feed on the bark.
Where deer pressure is heavy, a deer repellent applied before the first hard freeze and reapplied through winter gives young plants a better chance.
Do not leave trunk guards on indefinitely. Inspect them regularly and remove or adjust them before they restrict growth or trap moisture against the bark.
Common Fall Planting Mistakes
Most planting failures are caused by a small group of preventable mistakes:
- Planting the root flare too deeply
- Digging a narrow hole with compacted sides
- Adding excessive compost or peat moss only to the planting hole
- Leaving circling roots uncorrected
- Leaving twine wrapped around the trunk
- Failing to remove synthetic burlap
- Piling mulch against the trunk
- Assuming fall rain eliminates the need for watering
- Watering constantly without checking drainage
- Staking every tree automatically
- Forgetting to remove stakes and ties
- Fertilizing heavily at planting
- Pruning healthy branches unnecessarily
- Ignoring mature size and utility conflicts
Get the planting depth, roots, water, and site right, and you have already handled the most important parts of the job.
Fall Planting Questions, Answered
When is it too late to plant trees and shrubs in fall?
There is no single cutoff date. In most regions you can plant container-grown and balled-and-burlapped trees and shrubs as long as the ground is not frozen or waterlogged and the soil can be worked around the root ball. The first light frost does not end the planting season. Earlier is still better, because roots need time to establish before the ground turns cold.
Can you plant evergreens in the fall?
Yes, but plant them earlier in fall than deciduous plants. Arborvitae, hollies, junipers, spruce, pine, cypress, cherry laurel, and boxwood keep losing moisture through their foliage all winter, so their roots need time to establish before winter winds and frozen soil cut off access to water. In colder or windy regions, aim for early fall rather than late.
Can you plant trees and shrubs in winter?
In climates where the ground does not freeze solid, yes. Professional growers plant woody plants during dormancy routinely. The requirement is workable soil — never plant into frozen ground, saturated soil, or a hole holding water. If a mild winter window opens, water thoroughly after planting and mulch the root zone.
How deep should you plant a tree?
Measure from the root flare, not the top of the container. The root flare is where the trunk widens into the major structural roots, and it should sit at or slightly above the finished soil level once planting is complete. Nursery containers often carry excess soil over the flare, so brush it away and find the first structural roots before you measure the hole. In heavy clay, planting slightly high is safer than planting deep.
How often should you water a newly planted tree in fall?
Check the soil instead of following a schedule. Water slowly and deeply whenever the root ball and the soil around it start to dry several inches below the surface. Frequent shallow watering encourages shallow roots and can leave the center of the root ball dry. Keep checking until the ground freezes, and water thoroughly before freeze-up if autumn has been dry.
Should you fertilize trees and shrubs when planting in fall?
Usually not. High-nitrogen fertilizer pushes soft top growth at the moment the plant should be building roots. If you use anything at planting, choose a low-nitrogen starter formulated for transplanting rather than a general-purpose feed, and save the regular fertilizer program for the following spring. A soil test will tell you whether there is an actual deficiency to correct.
Woodie's Take: Plant the Shade You'll Appreciate Later
Planting a tree is one of the few garden projects where the real reward keeps getting better long after the work is finished.
The maple that looks modest beside the driveway today may shade parked cars in years to come. The oak planted at the edge of the yard could become a habitat for generations of wildlife. The redbud outside the kitchen window may become one of the first signs of spring your family watches for every year.
Shrubs work on a shorter timeline, but the same idea applies. A row of small evergreens can become a private backdrop. A collection of flowering shrubs can turn an empty foundation into a garden. A native shrub planted this fall can provide flowers, shelter, and berries in seasons ahead.
Fall gives trees and shrubs a quieter beginning. The air is cooler, the soil is still holding warmth, and the plants can begin settling into the landscape before summer asks more of them.
Choose the right plant. Give it enough room. Find the root flare. Dig wide, plant shallow, water deeply, and keep the mulch away from the trunk.
Then step back and give it time.
The best day to sit beneath a mature shade tree may be years away. But the best time to begin creating that shade could be this fall.